There is no Swiss army knife out there when it comes to iSUP accessories. Each one of them solves a problem of some kind in some particular way.
This exhaustive take on the many iSUP accessories aims to put your mind at ease by helping you make a more informed decision as I go over their potential uses and so forth. To make better associations, also check out this SUP Buying Guide article.
Exploring the 31 iSUP Accessories
I’ve taken a good look at almost all the inflatable SUP accessories out there to determine whether or not they can prove useful in some way. I’ve broken them into these 3 categories for a better overview:
- must have (4);
- special case (3);
- optional (24).
I just had to categorize them in some way in order to better emphasize their uses.

Must Have iSUP Accessories (4)
Must haves include the most essential inflatable SUP accessories usually already included within the package: a pump, paddle, fin(s), and a storage bag. These are needed for the vanilla experience. (what’s a “vanilla exp”? It’s just a figure of speech for the lack of a better catchphrase)
1) Must Have: PUMP
Since were’re talking about “inflatable” stand up paddle boards, they ought to be filled with air somehow. There are 2 ways to go about it: use a manual pump or an electric pump (blowing with your mouth is not really an option – need to reach somewhere between 12 and 15 PSI). Every iSUP package comes with a manual pump, but here you can actually buy an extra pump if the one in the original package is known to be of poor quality.
Manual pump vs electric pump
This can be summed up like this: practicality vs convenience. The first is better suited for when you don’t have access to electricity when need be and you don’t mind a little warm-up before paddling. You can have it both ways and simply bring the manual pump for backup. I prefer the manual pump.
Not all SUP manual pumps are equal
There are single, double, and even triple-action manual pumps with either one or more air chambers out there, and all of them should have an air gauge on top of them to measure PSI nowadays. Single-action is where the air is pushed into the board on a single down stroke, double-action is where that happens on both down and up strokes. There are more settings, but they are there to make pumping more efficient at different pressure levels. Pumping with manual pump is usually slower and can take anywhere from 5 to 30 minutes depending on various factors.
Similar thing with SUP electric pumps
In essence, these too push air into the inflatable paddle board, albeit using electric power instead. Some connect to and get the power from a pre-charged integrated or external rechargeable battery pack, some can be plucked into a cigarette lighter found in driver’s compartment, and others have multiple power sources available. Most of them reach a max PSI of 14.5 which is fine, some up to more than 20 PSI. They tend to be faster than manual pumps, taking under a minute, usually a few minutes to inflate a board, and have a pressure gauge along with multiple air valve adapters as well.

Double action high pressure iSUP pump – check its price here.
HR (Halkey-Roberts) valve adapter (not removable);
Up to 29 PSI.

Triple action dual chamber high pressure Titan iSUP pump – check its price here.
Also using the HR (Halkey-Roberts) valve adapter;
Easy maintenance (everything replaceable);
Up to 30 PSI.
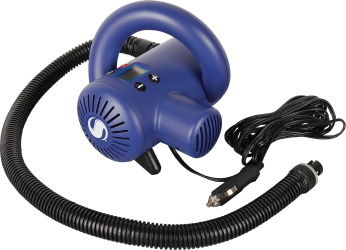
12V high pressure electric iSUP pump – check its price here.
Includes the HR (Halkey-Roberts) valve adapter and more;
Power source: 12v car outlet (cigarette lighter);
Inflates 1 board (will likely overheat if more);
Up to 14.5 or 15 PSI.
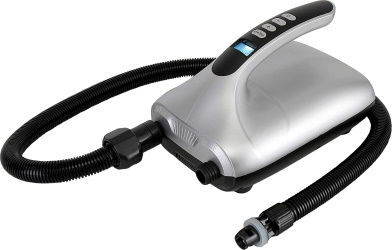
12 V high pressure electric iSUP pump – check its price here.
3 different thickness HR (Halkey-Roberts) valve adapters;
Inflates at least 2 boards in a row (otherwise overheats);
Power source: 12v car outlet (cigarette lighter);
Also features deflation;
Up to 20 PSI.
2) Must Have: PADDLE
Albeit self-explanatory on the surface, the SUP paddle doesn’t look nor function like a regular paddle. Most iSUP packages already come with a paddle of some kind, usually on bar with the quality of the board itself. Paddle is a bigger investment if bought separately.
Some general pointers
A SUP paddle is different from a regular paddle because the blade is at an angle. Additionally, the paddle itself is much longer – you ought take your length and add 8 to 12 inches to it for it to be a proper SUP paddle. Most entry level paddles are adjustable and have a balanced blade shape. They’re usually made of aluminium and plastic because that’s the most cost-effective combination for a beginner. If you got into SUPing more seriously then you might want to go more advanced and buy a custom non-adjustable paddle with the perfect size and shape along with the most suitable materials tailored just for you. But for the latter you may need first hand experience to get a feel for things first because theorycrafting only gets you so far.
Convert your SUP paddle into a kayak paddle!
Some 3-piece paddles can be converted into a hybrid kayak paddle. Usually the brands selling those paddles add the 2nd blade as an option you can buy separately.
Double-bladed SUP paddles
Ah, yes, there they are. A sort of hybrid kayak switchblade SUP paddle. Some people prefer these over the traditional one-sided SUP paddle. You ought to buy one of these separately though as it’s not compatible with a regular 3-piece SUP paddle, I don’t think.

3-piece adjustable alloy SUP paddle – check its price here.
Materials: aluminium shaft, nylon composite blade;
Adjustable from 66 to 83 inches;
Weighs 2.1 lbs;
Floats.

3-piece adjustable carbon fiber SUP paddle – check its price here.
Materials: carbon fiber everything;
Adjustable: 69 to 87 inches;
Weighs +- 1.5 lbs;
Floats.

4-piece adjustable carbon fiber SUP & kayak paddle – check its price here.
SUP paddle with extra blade to turn it into hybrid kayak paddle;
Materials: carbon fiber shaft, polyurethane blade;
Adjustable from 67 to 87 inches;
Weighs roughly 3 lbs;
Floats.

Double-bladed double-sided 5-piece SUP paddle – check its price here.
A quite literal stand up sort of kayak paddle;
Materials: carbon fiber everything;
Suitable for paddlers 5’2 to 6’3;
Adjustable: 118 to 156 inches;
Weighs 2.6 lbs;
Floats.
3) Must Have: FINS
Most inflatable board packages already come with a set of fins, so I’m not going to dwell on this too much either… And some times you don’t really have too many options depending on what kind of a fin box your board has.
General overview of what fins do
Fins can be vital if you’re looking to take different SUPing activities seriously because they affect the tracking ability, maneuverability, and stability of the board. The longer bigger central fin, usually detachable, is best suited for calmer flat waters as it keeps the board going straight and improves its stability. Most all-around inflatable paddle boards also include 2 smaller side fins so as to expand the board’s use for shallow or the more rough waters in general. With the bigger fin removed, the two side fins make the board even more maneuverable.
Fin box
And in case you wanted to buy better fins to replace the original ones, you of course have to figure out what type of a fin box you’re dealing with so as to be able to find compatible set of fins. With some iSUPs your only option is to buy new fins from the original seller because the fin box might not be some universal one.
4) Must Have: STORAGE BAG
This too is usually included within the package upon purchase, and they tend to be much bigger than your typical backpack. A cheaper package tends to come with a lower quality backpack, and a more expensive iSUP package with a decent quality backpack.
When does a decent quality backpack matter?
As was established, in the grand scheme of things, there are low quality backpacks and then there are decent quality backpack carry bags. You should really go for a decent quality backpack when you’re traveling without access to any other means for storage (car, hotel/house/apartment by the river/lake/beach, etc). If going by bike or plane, or when going for a an adventurous multiple-day touring trip with camping in the wilderness in-between, it would really, for the lack of a better word, suck to have that backpack fall apart on you with all its contents spread around you when you zip it in a hurry or hit a puny branch along the way…
Planning a trip by plane?
These iSUP backpack carry bags are fairly big, most being around 36 and 39 inches tall, 14 to 18 inches wide, and 9 to 15 inches deep. I believe for most airlines those dimensions are stretching the limits set forth on the allowed carry on luggage size. At this point you have 2 options: pay the extra (oversize fee) or run the risk of it getting flagged and inspected. In the latter case, the backpack might reach back to you only after many days have gone by.
What are my options then?
There are a few iSUP backpacks that try to squeeze themselves into the allowed size limits for most air travel guidelines and will likely serve that purpose just fine. And granted, they’re of decent quality as well. However, in order for the iSUP to fit into such a backpack along with the paddle, pump, and so on, it in most cases can’t really be some 35-inch wide 14-feet long paddle board. It ought to be a smaller one, the smaller the better.

Peak inflatable paddle board back pack – check its price here.
Dimensions: 36″ x 14″ x 12″ (height x width x depth);
For iSUP up to 12’6 in length & 33″ in width.

BPS Premium inflatable paddle board backpack – check its price here.
Dimensions: 39.37″ x 17.72″ x 14.17″ (height x width x depth);
For iSUP up to 12’6 in length & 34″ in width;
The logo might not fly* too well.

Thurso Surf inflatable SUP roller backpack bag with wheels – check its price here.
Dimensions: 39″ x 16″ x 14″ (height x width x depth);
For iSUP up to 12’6 in length & 33″ in width.

Retrospect inflatable SUP roller backpack bag with wheels – check its price here.
Dimensions: roughly 36″ x 12″ x 12″ (height x width x depth);
For iSUP up to 12′ in length & 31.5″ in width.
Special Case iSUP Accessories (3)
“Special case” accessories solve a unique problem and are NOT just nice-to haves. Because sometimes going vanilla is not an option for one reason or another…
1) Special Case: STABILIZER
It’s what it sounds like: SUP stabilizer makes the board more stable, almost like training wheels for a bike. The most common low-cost solution is basically inflatables strapped to either side of the board making it almost impossible to tip the board too much.
I can see a few uses for it
One would be yoga. Stabilizers can be a quick fix for when the board would otherwise be a little too unstable for that practice. Additionally, one’s old age, but also injuries can make this SUP stabilizer a very promising addition. It’s also just good for when you need extra stability, say when you’re out fishing or trying to get those awesome shots by controlling an air drone with a camera attached to it. At this point your imagination might easily beat mine and come up with more uses for the SUP stabilizer.

Inflatable SUP stabilizers – check its price here.
For iSUP up to 37 inches wide and up;
Inflate by blowing or pumping;
Valve: Speed Safety Valve.
2) Special Case: PFD
Stand up paddle boarding is almost always regulated by certain laws where ever you are. And there are, of course, good reasons for that. It’s a “No shit, Sherlock” moment here…
But do you really need a PFD?
You might think you’re a strong swimmer or whatever, and guess what, I too consider myself a strong swimmer, but I’m pretty good at standing on two legs as well. However, if a truck hit me at 80 mph, chances are I won’t be standing all that well ever again. It is those unexpected moments a PFD (personal flotation device, e.g life jacket and its variables) comes handy (along with a whistle). The higher the risk factors, the more reason to have one with you. Have a quick read.

Onyx M-16 Belt Pack Manual Inflatable Life Jacket – check its price here.
Inflates 17 lbs with 16 gram CO2 charge with 3/8″ thread;
Additional oral inflation up to 26.7 lbs;
For persons 16 years and older;
Onyx M-16 rearm kit & video;
Type III, USCG Approved.

NRS Ninja life jacket – check its price here.
Front zippered pocket storage;
Type III, USCG Approved;
Varying sizes available;
16.5 lbs flotation.

Dog life jacket – check its price here.
Colors: orange or pink;
Varying sizes;
Instructions.

Storm Safety Whistle – check its price here.
Waterproof, works even under water;
Up to 130 dB.
3) Special Case: LEASH
This too usually comes with the package and is usually a coiled one, which is perfectly fine for a beginner not looking to challenge themselves in whitewater or surf right away. Quality here doesn’t matter too much (except maybe for the quick release ones).
- Coiled leash – calm waters, some ocean
- Straight leash – surfing
- Upper body mounted quick release leash (coiled) – moving waters with entanglement risk (in case you didn’t have a quick read from before).

BPS Storm SUP coiled leash – check its price here.
Highest quality and comfortable;
Has a hidden key pocket;
Stretches to 10 feet long.

BPS Storm SUP straight leash – check its price here.
Highest quality and comfortable;
Choose between 5′ and 10′.

NRS Quick-Release SUP Leash (coiled) – check its price here.
Attaches to a compatible life jacket;
Stretches up to 9′ long.
Optional iSUP Accessories (24)
I categorized the rest of the iSUP accessories as optional because they aren’t vital for SUPing casually. With these you can instead customize your paddle boarding experience and pave the way for some more advanced SUP activity (e.g adventurous long-distance touring).
I’ve further divided them based on how they’re used in the general sense: glue-ins, D-ring attachments, mount-ins, and then 3rd party accessories related to iSUPs (note that gluing something permanently onto the board could run you into issues with the warranty should the need for it ever arise).
OPTIONAL: Glue-In iSUP Accessories
1) Glue-In: PVC ADHESIVE (glue)
Did you know that all those D-rings along with the traction pad are glued onto the inflatable paddle board? Do you know what that means? That means you too can glue extra D-rings and other things onto the board!
Customize your inflatable paddle board!
You can quite literally customize any inflatable stand up paddle board as per your needs. Want a kayak seat, but the board you bought lacks the necessary D-rings? Add them! Want more storage space at the front? Add more D-rings and put a bungee cord through them! Want to install an extra carry handle at the nose and at the rear of the board? What are you waiting for? You can use this glue for repairs as well if you had extra PVC patches (and you can buy these too if need be). There are a lot of cool options out there, try to think outside the box here.

PVC Vinyl Cement Glue – check its price here.
Shelf life of about 6 months when opened;
Very sticky indeed;
Includes a brush;
Quantity: 8 oz.

NRS Stabond Adhesive – check its price here.
Self life of about 6 months, up to 1 year;
Includes accelerator;
Also very sticky;
Quantity: 8 oz.
2) Glue-In: D-RINGS
Now that you know you can simply just add more D-rings onto your inflatable stand up paddle board using a PVC compatible glue, let’s see why, where, and how to add an extra D-ring or two.
What are D-rings for?
D-rings are those multi-purpose metal rings (shaped like a D) used mainly for attaching things like the leash, anchor, kayak seat, coolers, and so on, onto the inflatable paddle board. So yeah, they’re pretty handy.
Where should I put them?
Most iSUPs have a few of them already glued in upon purchase. Usually they can be found at the rear of the board for a leash/anchor, also on the sides at the middle area for a kayak seat/coolers, and at the nose of the board for the bungee cord making up the storage area. Try to plan things through before you start to add them in random places because they’re not easy to remove afterwards depending on how you put them there.
How do I install them?
Usually the D-rings are connected to a PVC patch (round shape) which you ought to glue onto the board. When it comes to the quality, make sure at least the D-ring itself is made of decent quality stainless steel.
Things you need:
- D-ring patch;
- PVC adhesive (glue);
- a well ventilated area;
- cleaning solvent (alcohol, Acetone, or MEK);
- old credit card, a spoon, or something like that.
Instructions for installing a D-ring:
- make sure the board is inflated;
- figure out where you want to install the D-rings;
- clean the areas with the cleaning solvent and let things dry;
- apply a thin layer of glue onto the area and the bottom of the D-ring;
- place the D-ring on top of the board;
- use the credit card to get the air bubbles out;
- remove excess glue that might have squeezed out in the process;
- apply pressure for a few minutes and leave the glue to dry for the bond to set in;
- (instructional video)

Non-sticky D-Ring Patch – check its price here.
Made of PVC and stainless steel;
Glue not included;
3) Glue-In TRACTION PADS
You won’t come across an inflatable paddle board that doesn’t have a traction pad already installed. And passengers (kids, pets, companions in general) at the front don’t generally need one either because the PVC material itself is rubber-like and not exactly slippery (though the traction pad adds some extra softness). The dog’s nails typically don’t damage the PVC either.
When might I need to look for traction pads?
However, when your dog or some other companion is almost always with you on the board, you could always extend or add a separate traction pad at the nose of the board anyway. On another note, there might come a time you may want to replace the old traction pad with a new one, but that’s far too rare of an occasion, so I’ll not dwell on that at all. Usually you can simply just glue the old one back onto the board if it’s starting to peel off, and the gluing process is pretty much the same as it was for the D-ring.

SUP deck pad for dogs – check its price here.
You can DIY cut to fit when need be;
dimensions: 24 x 19 x 0.2 inches;
Self adhesive backing.
4) Glue-In: SUP STICKERS/DECALS
I’m not heavy on sticker swag myself mainly because I’d probably ruin the aesthetics of the craft rather than improve it, but they are an option.
Where to use them?
Apart from the inflatable sup itself, these can be used on the paddle and other SUP gear, but also on car windows, laptops, phone covers, and so on.
Why use them?
Some places require you to have a “launch permit” or a registration tag stuck onto the board. You could also stick some contact information on things so that there’d be at least a chance of somebody returning them when lost. They’re also just for spreading awareness of the sport. And some sticker/decal sellers donate some of the money to ocean clean-up.
What to watch out for?
Well, of course, it ought to be waterproof and weatherproof, preferably a vinyl decal sticker with UV protection. Most such stickers come with a sticky bottom, but that glue might not be suitable for sticking it to a rubber-like inflatable paddle board, so you may want to use a variant of a PVC glue similar to that used for attaching the D-rings (scroll up a bit).

NALU SUP Sticker – check its price here.
Part of the profits go to ocean cleanup efforts.
5) Glue-In: BUNGEE STORAGE KIT
Now this is something almost every single iSUP I’ve come across has. It’s a cost-effective simple storage area made up of a bungee cord attached to D-rings. That said, there are many more accessories for storing things, and these too tend to attach to the D-rings, not just under this bungee cord.
What can you store under the bungee cord?
Depending on the size of it, you could stick a paddle there, some smaller storage containers or just waterproof bags with your belongings in there. If it ended up being too small for your needs, you could always add a few more D-rings (check for the installation guide of D-rings above somewhere), replace the original bungee cord with a new longer bungee cord and cut it to suitable length. And if your iSUP didn’t have a bungee cord, but you wanted one…

Bungee storage kit – check its price here.
4 stainless steel D-rings & PVC patches;
12 feet of 3/17 inch bungee cord;
Glue NOT included.

Bungee cord – check its price here.
1/4 to 3/16 inch bungee cord;
Length: 10 to 500 feet;
Varying colors.
6) Glue-In: MOUNTS
When it comes to SUP mounts, there are 2 ways to go about them that I know of: sticky mounts or air suction mounts. Both can work, but in this section I’ll go over the glue-in mounts (sticky ones).
What’s a SUP mount?
Glad you asked. Similarly to D-rings, mounts are attachment points for various accessories (cameras, speakers, sensors, phone & phone case holders, rod holders, cup holders, paddle holder, and so on). The base of the mount is in this case glued onto the inflatable paddle board to which the various other things can be attached to using for example a multi-purpose ball connection system (in the case of RAM Mounts).
How to install?
Refer to the D-ring installation instructions above somewhere. Pretty much the same thing. Most such mount bases have a sticky material already applied, but in my opinion, more often than not, that pre-placed glue is a little too unreliable for attaching it onto the PVC material of the iSUP for long. Better to use quality glue to minimize the risk of the mount just popping off all of a sudden.
Both the D-ring and mount attachments as accessories are discussed further down below.

RAM Mount System Ball Base – check its price here.
Double-sided adhesive & alcohol prep pad;
Size: B size 1-inch RAM rubber ball;
Glue-in mount base.
OPTIONAL: D-Ring iSUP Attachments
1) D-Ring Attachment: ANCHOR
This is pretty much as it sounds like. It’s a little anchor attached to a rope which in turn is attached to the aforementioned D-ring usually at the rear of the board. You can DIY or buy an anchor specific to your needs based on the type of water you’ll be using it in.
Potential uses for the anchor
Anchor comes handy whenever you need your board to stay put, be it during fishing, practicing yoga, or when controlling an air drone for those awesome shots, snorkeling, relaxing/reading/napping and so on. And if you had no D-rings to attach the anchor to, you could always install a D-ring yourself (scroll up a bit).

Best Marina Anchor for iSUP – check its price here.
Stainless steel carabiner clip connection;
Rust resistant galvanized iron anchor;
Includes nylon storage bag;
Anchor weighs 3.5 lbs;
40 feet length rope.
2) D-Ring Attachment: PULL-BEHIND FLOATING SUP COOLER
A tiny tow behind kayak cooler for extra storage mainly for food and drinks, but you’re not forced to use it only for that. It tracks well and keeps the water out just fine. There are other kinds of pull-behind coolers, but this seems like the most solid option out there currently.
Where to use it?
It’s a fun, but not super practical addition for when you’re planning to go on a longer time-off outing, fishing for example, and need that extra space. You can simply attach the rope to the D-ring and you’re be good to go.
Practicality
If you’re planning to move around a lot, it’s probably not all that practical. It becomes more practical with some low-key motorized propellers that create a constant movement. If you’re planning to paddle yourself, putting too many items in it makes those constant little tugs throwing you off balance more prominent and it can become incredibly annoying especially when the waterway is not calm.

Tow-behind floating cooler – check its price here.
Insulated, ice retention of 48 hours;
Tracks well due to the design;
30-quart capacity;
15-quart version.
3) D-Ring Attachment: COOLER/DRYBAG/DECK BAG
There are many different deck bags and coolers in varying sizes to choose from and they all share a similar purpose: to store something. They are usually attached to the D-rings holding them in one place. And in case your iSUP didn’t have enough D-rings, you could always add some more by yourself (scroll up a bit if you missed it).
Potential uses for them
Dry bags and deck bags can prove useful for storing extra equipment for some adventurous touring trips for example, but also to simply hold your gear in case you didn’t arrive by car and thus don’t have anywhere to put excess belongings. Some coolers you can sit on and attach more accessories onto, like fishing rods and what have you. There are many more cool stuff you can use them for, but that was the general gist of them.

Hard Cooler Dry Box – check its price here.
Includes shoulder strap & 4 rods;
Stainless steel components;
Airtight waterproof seal;
And you can sit on it.
Doesn’t include any connections (e.g cooler straps), so you kind of have to DIY with bungee cord over the rod holders or something

SUP Dry Sack – check its price here.
Capacity size from 2 to 30 liters;
Waterproof & floating;
Varying colors.

Vinyl Coated Deck Bag – check its price here.
Dimensions: 14.5″ x 13″ x 5″ (length x width x height);
Splashproof (not underwater-proof);
Capacity size 15.7 liters.
4) D-Ring Attachment: KAYAK SEAT/BEACH CHAIR
You’ve probably seen those extra low “kayak seats” sold for iSUP boards, but nothing is stopping you from buying a proper beach chair meant for SUPs. Coupled with a SUP paddle converted into a kayak paddle, this can be quite a convenient way of going about it (check the “must have: paddle” section).
Why use it
Apart from the more practical uses during fishing and so on, it can also be a simple change of pace. Don’t feel like standing, but wouldn’t quite just awkwardly sit down either, pull out the foldable beach chair or the kayak seat and experience SUPing slightly differently. (in my opinion the foldable beach chair is more comfortable as it’s higher off the ground and supports back way more).
How to use them
They generally have straps with them you can connect to the D-rings on either side. The “kayak seat” takes some more messing with to get it just right. On the other hand, albeit connects to the D-rings with the straps in a similar manner, the foldable beach chair is that more easier to set up and tighten, but it does take more room in every way. And in case you didn’t have D-rings for them, you can always add them yourself (scroll up for D-ring installation instructions).

iRocker iSUP Kayak Seat – check its price here.
Dimensions back seat: 21″ tall & 18″ wide;
Dimensions bottom: 12″ long & 15″ wide;
4 straps + clips for D-ring connections;
Seat handles 200 lbs+ weight;
D-rings not included.

Lightweight aluminium beach chair – check its price here.
Basically a beach chair you can tie down onto the board;
Dimensions: 28″ x 21″ x 11″ (height, width, depth);
23-inch clearance from ground to bottom seat;
Tie down rope/bungee cord not included;
Seat easily handles 200 lbs+ of weight;
D-rings not included.
OPTIONAL: Mount-In iSUP Accessories
Assuming you’ve got your mount base installed already (check the glue-in section. Oh, and by the way, I’m using RAM Mounts as a reference point for all the mounts here), be it stuck there using glue or air suction.
Why RAM Mount?
You might be thinking whether there’s an alternative to RAM Mounts. I couldn’t really find any apart from the DIY (do it yourself) improvised solutions or ones that were simply very limited (e.g Scotty mounts, Arkon Mounts, etc). But if you did find decent alternatives and preferred one of those over the RAM Mounts then, well, you’ve simply got more options now. I’ve gone with the RAM Mount system myself, so that’s what I’m using to explore the mount-in iSUP accessories…
1) Mount-In: GoPro CAMERA
You’ve likely heard of this neat little thing or seen videos made with it. Also known as action camera, this allows you to take cool high quality shots (video clips) from unique angles for GoPro Camera tends to be very small and easily mountable. I’d use it mainly to capture unexpected moments as I’m not the type of person to actively look for them myself. I like to keep my attention on relaxing or whatever else I was up to at the time of SUPing.
Things you need: (B size = 1 inch ball size)
- RAM Track Ball Base (the thing you glued onto the iSUP – scroll up a bit; “Glue-In section”)
- RAM Double Socket Arm (connects to the base ball)
- one of the RAM Action Camera Universal Ball Adapters (its ball connects to the arm)
- GoPro Camera (the Ball Adapter connects to the GoPro Camera)
The RAM Mount system is multi-functional and is not limited to this one camera set-up only. You can replace the camera and all those parts with other RAM Mount parts and also with other RAM Mount compatible accessories like phone holders, rod holders, and so on.
You could also explore ways to involve a GoPro gimbal stabilizer in the mix.
2) Mount-In: ROD HOLDER
Self-explanatory, isn’t it? But here I’d probably consider Scotty mounts over RAM Mounts if your area had bigger fish to catch. Where I’m from the fish tend to be super small in comparison (Northern Europe). To recap: Scotty mounts = strength; RAM Mounts = unlimited adjustability.
Things you need: (C size = 1.5 inch ball size)
- RAM Track Ball Base (the thing you glue onto the iSUP – you need a C size here)
- one of the RAM Fishing Rod Holder variants (connects to the Track Ball – these are C size)
- a fishing rod (the Fishing Rod Holder clamps onto the rod and holds it tight)
Think outside the box
There are of course more ways to attach the fishing rods to the iSUP. Some sitting boxes or fishing deck bags/coolers can be customized (DIY style) to hold the rods instead, and so on. Try not to limit yourself to what’s written here because I can’t possibly bring them all out. Can’t risk you folks losing interest while reading all that.
3) Mount-In: SMARTPHONE HOLDER
RAM Mounts has a solution for this, too. A sort of X-design clamp to fit different sized phones and even phone cases. The X-design clamp has that ball for connecting with other RAM Mount parts in order to allow you to customize things to be the way you want.
Things you need: (B size = 1 inch ball size)
- RAM Track Ball Base (the thing you glued onto the iSUP – scroll up a bit)
- RAM Double Socket Arm (connects to the base ball)
- one of the RAM X-Grip Phone Holders With a Ball (its ball connects to the arm)
- and of course a phone or a phone case (make sure the sizes are compatible to fit in the X-Grip you choose)
Unlimited adjustability
As per usual, try not to limit your though process to this one set-up. There are various other options to configure the set-up to your liking. You can make it higher, lower, and so on, using various RAM compatible parts.
4) Mount-In: CUP/DRINK HOLDER
A simple drink holder (varying sizes). I personally don’t see too much of a point in it. I’d rather bring a simple bag and toss a bottle in there instead. Less hassle. But… the cup holder can be useful in some cases. Additionally, there are of course many solutions to holding one’s drink, but in this section I’ve taken a closer look at one of the mount-in cup holding solutions, the RAM Mount CUP Holder in particular.
Things you need: (B size = 1 inch ball size)
- RAM Track Ball Base (the thing you glued onto the iSUP – scroll up a bit; thought you could use an air-suction mount base for this one instead)
- RAM Double Socket Arm (connects to the base ball)
- one of the RAM Drink Holders With a Ball (connects to the arm socket)
I’m not sure what to think of setting up a RAM Mount system just to hold a drink in normal circumstances… I’d see it as reasonable option maybe in a super chill state or the like, making oneself real comfy.
5) Mount-In: SENSORS
I wish I knew of more awesome sensors to use, but here I’ll just mention the fishfinder transducer. It’s a device that shouts into the depths and listens for the echo to transform those signals into some sort of a usable feedback. In the case of fish finders, the feedback gives you an idea of a certain activity down there. And we can stick this thing onto a RAM Mount, too.
Things you need: (all parts need to be in one size, either B, C, or D)
- RAM Track Ball Base (the thing you glued onto the iSUP – scroll up a bit)
- RAM Double Socket Arm (connects to the base ball)
- one of the RAM Marine Electronic Mounts With a Ball (the ball connects to the arm socket)
- a fish finder device (make sure it fits if you’re going the RAM Mount route with this)
It’s not a must-have iSUP accessory for fishing, of course, but it’s a nice little thing to keep you occupied.
6) Mount-In: LED LIGHTS
This is probably the most DIY iSUP accessory item I’ve come across. You could simply just stick a simple handheld flash light onto the RAM Mount rod holders or strap some water resistant LED lights against the board. I wouldn’t make a habit out of paddling at night anyway. Just saying. For me, a water resistant flashlight a deck bag does the trick.
Things you need: (B size = 1 inch ball size)
- RAM Track Ball Base (the thing you glued onto the iSUP – scroll up a bit)
- RAM Double Socket Arm (connects to the base ball)
- one of the RAM LED Spotlight With a Ball (the ball connects to the arm socket)
Same deal
The RAM LED Spotlight can be recharged in a cigarette lighter. But honestly, I’d rather use a simple flashlight or something other entirely. So again, many options out there so try not to limit yourself to just these here.
7) Mount-In: GPS
I tend to use a smartphone for GPS tracking using an app or two (Go Paddling, Paddle Logger, GeoSUP, NOAA Radar Pro, etc). But there are dedicated GPS devices out there as well. Global Positioning System (that’s what they’re called in length) can be useful to plan out multiple-day touring trips, solo camping trips, and more. A cool little toy to keep you company in terms of some reassuring feedback and so on.
Things you need:
- RAM Track Ball Base (the thing you glued onto the iSUP – scroll up a bit)
- RAM Double Socket Arm (connects to the base ball)
- compatible RAM Cradle With a Ball for the GPS device (for mounting the GPS device)
- compatible GPS device
This too has many options
This set-up is a general idea of the parts needed to put this together. Since I don’t use a GPS myself (I’ve relied on the apps in my smartphone instead), I don’t want to recommend a random set-up either. RAM Mounts aren’t the only option either.
8) Mount-In: SPEAKER
There are quite a few cute little water resistant, some even floating, speakers you can mount on your iSUP either by air suction mount or a glue-in mount (some of them can be clipped onto the D-ring or the bungee cord and what have you). Most of them nowadays can store music rather than play them via Bluetooth connection only.
When to use it?
I prefer earbuds or headphones for listening music, podcasts and the like, but the speakers can be of use for pretty much the same reason: to relax and listen to some music while fishing, relaxing in general.

Bluetooth speaker – check its price here.
Waterproof, shockproof, dustproof;
7 Watt, 8 hours of playtime;
Removable air suction cup;
Up to 33 ft connectivity.
OPTIONAL: 3rd Party iSUP Accessories
1) Other: CLEANERS
Note that an iSUP has mostly PVC material covering the better half of the board while the deck pad (where you stand) consists of EVA foam material instead. That means certain moderately strong cleaning solvents are okay for the PVC surface and not really for the soft deck pad EVA foam material.
For cleaning the PVC surface
Here you can use mold remover, magic eraser, or baking soda. Mix it with water and use a brush to get rid of visible stains. For when the stain ends up being real stubborn, you can opt for the moderately strong detergents like Methyl Ethyl Ketone (MEK), Acetone, or alcohol.
Cleaning the EVA foam deck pad
Here you want to be a little more careful so as to not damage it or dissolve the adhesive. Soap and water are the way to go here instead. Additionally, try using a towel or a soft toothbrush instead of the brush initially (unless it’s soft enough). If that doesn’t help, you can start to amp up a little by applying stronger and stronger cleaning measures. Try not to go overboard with using too much of cleaning solvents though.
PS! Most of the time all you need is some soap and water along with something to rub it with.

NRS SUP cleaner, Methyl Ethyl Ketone (MEK) – check its price here.
Mainly for preparing the area for glue-in D-rings and such;
Adhere to proper safety precautions;
Evaporates slower than acetone;
1 qt (0.946353 liter).
2) Other: SILENT AIR REMOVER
Red Paddle Co has come up with yet another innovating little device. This time it’s the Silent Air Remover which reduces the sound created by the air rushing out of the iSUP upon deflation. So now instead of the say 120 dB (depends on what PSI we’re talking about), the noise level is reduced to somewhere around 80 dB.
PS! Some electric pumps can deflate the board as well, and in that case this becomes pretty much obsolete.

Red Paddle Co Silent Air Remover – check its price here.
Compatible with HR (Halkey-Roberts) valve;
E.g from 130 dB down to 80 dB.
3) Other: SUP KEY HOLDER / KEYCHAIN
Just a cute little accessory item reminding you of the activity. We humans tend to enjoy associating ourselves with the things we like. A SUP key holder. Pick and choose, pretty much.

Paddle board keychain – check its price here.
Paddle board design engraved on one side;
Two sizes: 1.25-inch and 2-inch diameter;
Made of cherry wood & twist cable.

American USA flag keychain – check its price here.
Size: 3.2″ x 1.4″ x 0.8″ (length x width x thickness);
Float is made of plyurethane foam;
Floats up to 1.2 ounces of weight;
The back side is left white.

Mermai Holding Trident Circle Nouveau Kelp keychain – check its price here.
Size: 3.2″ x 1.4″ x 0.8″ (length x width x thickness);
Float is made of plyurethane foam;
Floats up to 1.2 ounces of weight;
The back side is left white.

HKEY SUP keychain – check its price here.
Made of semi flexible PVC plastic;
The paddle you see is flexible;
Size: 3″ long and x 1″ wide;
Has a stainless steel ring;
Varying color options.

Floating Key Holder – check its price here.
Made of solid compressed foam;
Size: 2.4″ long and x 2.1″ wide.
4) Other: BLUETOOTH EARBUDS
Water resistant earbuds are more of my style compared to speakers. With the phone in the waterproof phone case, I’m feeling fairly comfortable and not afraid about the electronics getting damaged or something. Bluetooth earbuds that are water resistant are pretty neat that way.

Powerbeats Pro Earphones – check its price here.
Sweat water resistant (not waterproof);
Compatible with Android & iOS;
Works on Bluetooth connection;
Up to 9 hours of listening time;
Includes a charging base;
4 different ear tips;
Adjustable.
5) Other: SUP SHOULDER CARRY STRAP/SLING
Since most inflatable paddle boards tend to weigh around 30 pounds only, for most people in normal circumstances the built-in carry handle will do just fine. However, for the petite women or the older folk this can prove handy. It’s a carry sling with padded shoulder support for carrying the board when inflated. They usually allow carrying the paddle as well wherein it acts as a handle for even easier carrying.
NB! The bigger the board, the more useful it can be.

SUP shoulder carry sling – check its price here.
Shoulder pad made of soft comfy neoprene;
High quality velcro paddle holder;
Adjustable straps.
6) Other: SUP PADDLE FLOATS
Usually SUP paddle “FLOATS” refer to the PFD (personal flotation device), but in this case I’m talking about making the paddle float (some paddle sink to the bottom). Most SUP paddles float by default, but some might float only a little bit and then sink anyway. You might just want to practice never letting go of the paddle when you lose balance and fall off the board, but that might not be an option under some circumstances for some people.
A couple of ways to make the paddle float:
- attach a leash onto the paddle (awfully inconvenient, but does the trick)
- attach a foam tube around the shaft of the paddle (DIY solution)